


PGP use on the Darkweb


Pretty Good Privacy (PGP) was created by Phil Zimmermann in 1991. He was concerned about the increasing surveillance and potential privacy intrusions by governments and corporations, and that’s why he created PGP, to ensure that people had access to a tool that would allow them to protect their personal communications and data from unauthorized access.
Even though PGP was created with the noble goal of protecting the privacy of all citizens, it didn't achieve widespread adoption among the general public. The complexity of using PGP (which is not much, as you will see here) and the need for understanding public and private key encryption made it less appealing to everyday users.
Instead, PGP found its niche among specific circles, like Dark web Marketplaces, Criminal Forums, Activists, Investigators and even Developers who use PGP to sign software releases.
Before we jump to see what uses PGP has nowadays and how we can use them for our investigations, let’s quickly explain the logic of Public and Private keys on encryption.
Public and Private Key
Public and private keys work together in a system known as asymmetric encryption. In this system, each user has a pair of keys: a public key, which is shared openly, and a private key, which is kept secret.
When someone wants to send an encrypted message, they use the recipient’s public key to encrypt the message. Only the recipient can decrypt it using their private key. Similarly, for identity verification, a user can sign a message with their private key, and anyone with the corresponding public key can verify the signature to confirm the sender's identity and ensure the message has not been altered.

How to Set Up PGP
Setting up PGP is very straightforward, you will only need to install the necessary software and generate your key pair. There are several programs that can do that for you, like Gpg4win (Windows), Kleopatra (Windows and Linux), GPGTools (Mac) or GnuPG (Linux). Let’s use GnuPG for the example.
Install GnuPG:
sudo apt-get install gnupgGenerate your pair of keys:
gpg --full-generate-keyAfter generating them, list your keys to confirm:
gpg --list-keysThe last step would be to export your public key, and share it with whoever you want. For that, run:
gpg --export -a "Your Name" > my-public-key.ascNow, anyone with your public key could encrypt a message or file, and the only one who would be able to decrypt it will be you, using your private key associated with the public key you shared.
Until now, I think everything is pretty clear, but you may be asking how are this PGP keys actually used in the real world.
Using PGP to Encrypt Messages/Files
Let’s simulate a common example on Dark web marketplaces. You are a buyer, and you want to send an address for the delivery to the trusted seller. First, you need to obtain the vendor’s public PGP key. Vendors typically post their public keys on their official profiles on the market. Here’s an example of what a vendor’s public key might look like (shortened version):
-----BEGIN PGP PUBLIC KEY BLOCK-----

mQENBFjliMcBCADiO7cf5F72BbVWcFqzQK1B4zJ9XJ4WGVu/BF6kkigM1b8x1hB8
1xiU9cTL1P4Z0h1l9+NjYFElkc6HL5nPvK7P5bOe6yQ4g7hn+qMfdu51cziqIY+a
...
=pDk6
-----END PGP PUBLIC KEY BLOCK-----
First, you need to import the vendor's public key into your keyring. Save the key to a file and import it:
gpg --import vendor-public-key.ascIf you now list the keys with “gpg --list-keys”, something like this will show up:
pub   2048R/ABC12345 2023-07-18 [expires: 2025-07-17]
      Key fingerprint = 1A2B 3C4D 5E6F 7G8H 9I0J 1A2B 3C4D 5E6F 7G8H 9I0J
uid                  Vendor Name <vendor@darkwebmarket.com>
sub   2048R/DEF67890 2023-07-18 [expires: 2025-07-17]
Now write your message:
Hello Vendor,

Please send the package to the following address:

123 Pepe Street
Unknown City, SC 12345

Thank you.
After saving the message in a .txt, use your PGP software to encrypt the message using the vendor’s public key. Here’s an example of how you would do this using GnuPG on a command line:
gpg --encrypt --recipient ABC12345 --armor message.txtThe output will be an encrypted message similar to the following:
-----BEGIN PGP MESSAGE-----
Version: GnuPG v2.0.22 (GNU/Linux)

hQEMA+yJoLIGM+QsAQf/dt2iCVG7fRRw0H2nA9MEGoSMQyzLKoEMJGxKsZXjTfQH
/k4IjaYaOXq76mF9stq9m3O8O3ZWZ4iFLRkz9wMzfI37it2xYPQk5T5I1l4BjXmt
RzlfZ05IaBz8l6kFbcxNlXFR9eBZV6GHFJzmcda2i7FzGly/I9yQAxARmXrzBGWV
Kg==3wF5
-----END PGP MESSAGE-----
Now, only the trusted vendor who owns that private PGP key would be able to see your message.
Using PGP to Verify Authenticity
I've encountered PGP most often when verifying the authenticity of messages or ensuring the validity of digital assets. As the guys from dark fail says:
Verify signatures. Don't get phished. Always PGP verify .onion and Bitcoin addresses before interacting with them.
The very premise of the dark web is anonymity, and PGP allows individuals to authenticate their identities without exposing any real personal information. And how is this done? With something called “Signatures”.
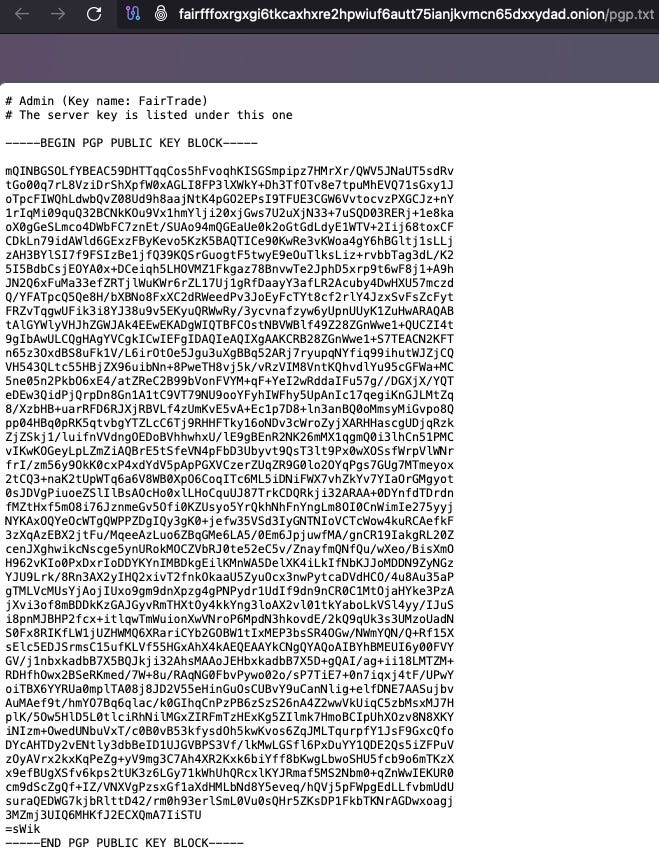
Trust and Reputation is everything in the Darkweb realm. You have probably heard about “canary”, which is a way for individuals to guarantee they have not being compromised by LEA or other actors. They look something like this:

What we see in the picture is the canary.txt file of FairTrade, a reputed escrow. Below the actual message, we can find his signature, which we can use to verify that this was written by FairTrade himself, and not an impostor. So, how signatures work? Let’s explain the logic:
Creating a Signature
Generating a Hash: The first thing we need to do is creating a hash using our message. A hash is a fixed-size string of characters that is produced by a hashing algorithm, such as SHA-256. This hash acts as a unique fingerprint for the message. If just one comma changes, the hash would be completely different. There are tons of tools that can do that for you, on the command line or websites like this one.

shasum -a 256 message.txt > message.hashAfter generating the hash, we encrypt it using our PGP private key. This creates a digital signature that is unique to both the message and our private key. If we are using GnuPG, the command will look like this:
gpg --output message.hash.sig --sign message.hashNow, combine the original message and the digital signature into one file. You can use
catto concatenate the files:cat message.txt message.hash.sig > signed_message.txtYou have created a message with its unique signature, which will have the same structure as the one we saw on the canary.txt from FairTrade.
Verify the Signature
Let’s say you want to use FairTrade services, but before doing so, you want to verify they are legit, and have not being compromised. For that, we need to find their public PGP key.
With the public PGP saved, we first need to separate the original message from the digital signature. Then use the public key to decrypt the digital signature, revealing the original hash. Next, create a hash with the received message using the same hashing algorithm. If the hashes match, it confirms that the message is authentic and has not been modified.
We can do all this steps using command line, but let’s take a different approach this time and use a tool that will do everything for us.
Go to http://darkfailenbsdla5mal2mxn2uz66od5vtzd5qozslagrfzachha3f3id[.]onion/pgp, and follow the instructions, which are basically copying the signed message, and then the public key. If results match, you will see something like this:

If they don’t:

Investigating PGP
At this point, you already know the two most common uses of PGP on the Darkweb, which are encrypting messages or files, and using it to verify the authenticity and integrity of digital assets or identities.
But is PGP actually useful for our investigations? Absolutely. PGP is highly valuable because it directly correlates to the identity of the individual, and we will encounter several times that PGPs are attached with other identifiers, like emails, keybase accounts, or mentioned in websites. For example, this one from Baphomet:

Obviously, how we approach the investigation after the discovery of the PGP key and the attached information, will vary a lot. But if you remember when we created the PGP pair of keys at the beginning, it asked you for a name and an email (optional). Let’s see a real case where using this email attached to a public PGP, we were able to get the identity of a Darkweb vendor pretty easily.
We could do it manually, saving the key and listing it with “gpg --list-keys” which would show the contact information attached, or use some software that does it automatically for you. In this case, we are taking the second route, with the help of Crimewall.
Knowing the alias of our target Vendor, we use it to search for his profile and get the public PGP listed on his profile.

We look for an attached email, and get any profiles that may be linked to it. There is a LinkedIn account, and a Google account with one review.
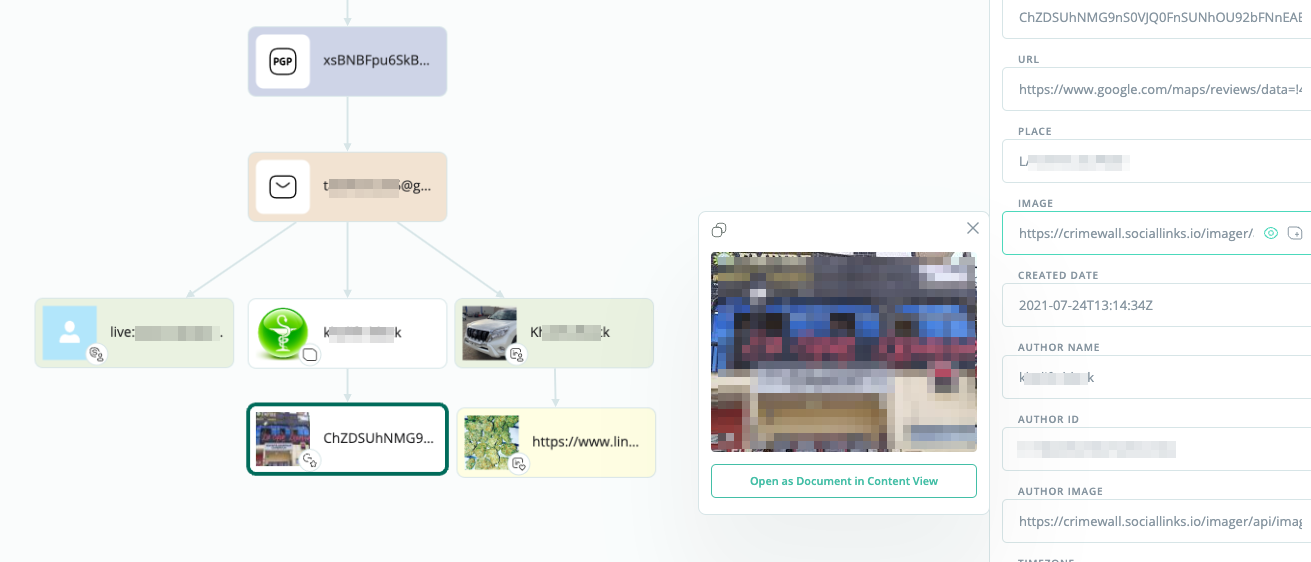
If we checked the review, we find that our guy posted some pictures inside that place.

Obviously, this vendor had a terrible opsec, breaking one of the most important rules: separate your personal life from your Darkweb identity. But during your journey as investigator, you will find that actors, maybe because of lack of knowledge, or for pure ego, will a lot of the times exposed themselves.
Conclusions
PGP is yet another asset, but due to its widespread use by actors, it is very important that we understand how it works and how it is used. PGP remains as an incredible technology that we ourselves can also use, and that I highly recommend you to do so.